Christmas is just around the corner, and in a continued attempt to express my love for both the environment AND my family/friends, I’ve set out to give all 100% homemade gifts this year. I hope this DIY guide helps you spend less, love more, and give from the heart!
1. DIY Candles
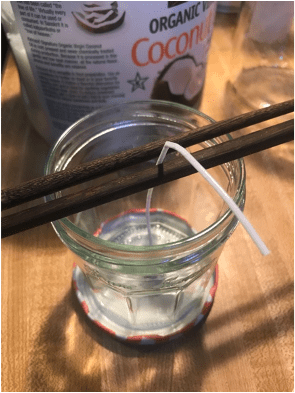
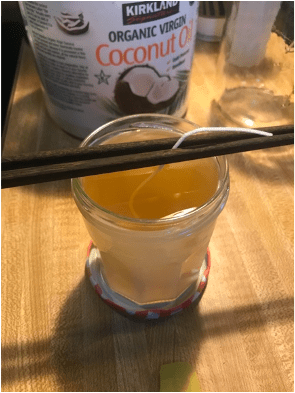
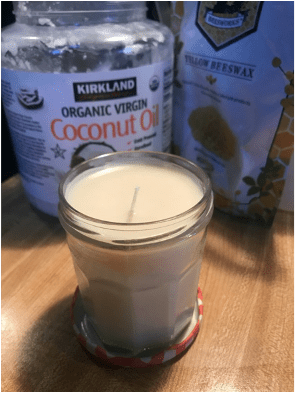
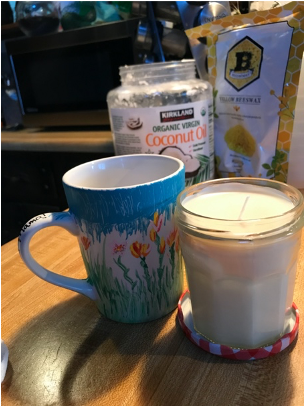
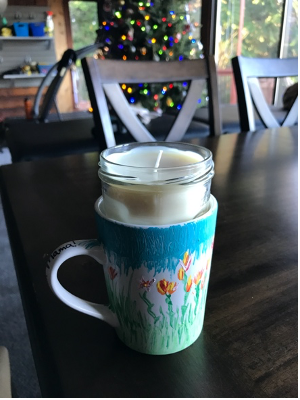
Supply List: ½ cup coconut oil, ½ cup all-natural beeswax ($14 on Amazon or Hobby Lobby), 10 drops essential oil of your choice, #4 wicks (less than $5 on Amazon or Hobby Lobby), glass container (repurposing an old jelly jar is my favorite!)
Directions: Place coconut oil and beeswax in a large microwave safe bowl. Heat for 1 minute at a time, stirring after each minute until completely melted and blended. Stir in essential oil. Place wick in empty, securing in place with two chopsticks so it stays in the middle. Pour liquid slowly into jar, adjusting wick if needed. Allow to cool, trim the wick, and enjoy!
2. DIY Hand Lotion
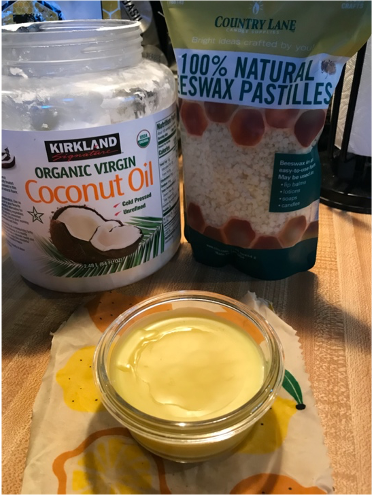
Supply List: Shallow glass container, ½ cup jojoba oil, avocado oil, argan oil, or any other liquid oil (I use a combo of all 3!) ¼ cup coconut oil, ¼ cup natural beeswax ($14 on Amazon or Hobby Lobby), 2 T. shea butter ($10 or less depending on size from Amazon or Hobby Lobby), 7-10 drops essential oil of choice
Directions: In a microwave safe bowl, melt coconut oil, beeswax, and shea butter for 60 seconds at a time, stirring frequently until completely melted. Add in ½ cup liquid oil(s) and essential oil, stirring well to combine. You may choose to use an emulsifier or blender. Pour into shallow glass container and allow to cool. This gift goes well with a wooden scooper and pairs nicely with a matching DIY candle of the same scent. They’re easy items to make together, especially since they require similar ingredients! Wrap in re-usable beeswax wrapping, along with the recipe, to make a fantastic, functional and sustainable gift.
3. Scrapbook
Supply List: 30+ photos, a scrapbook ($10 or less on Amazon or Hobby Lobby), non-acid glue stick, scissors, 15+ sheets of cardstock, protector sheets that fit the scrapbook you purchased (some scrapbooks come with these), fine tip pen, stickers (optional)
Directions: Print the photos you wish to include in your scrapbook. Once printed, arrange on cardstock to your liking, trimming photos if needed. Once you have your pages laid out in the design and arrangement you like, glue to cardstock. Allow to dry for 30-60 minutes before decorating with stickers and/or writing messages below and around photos.
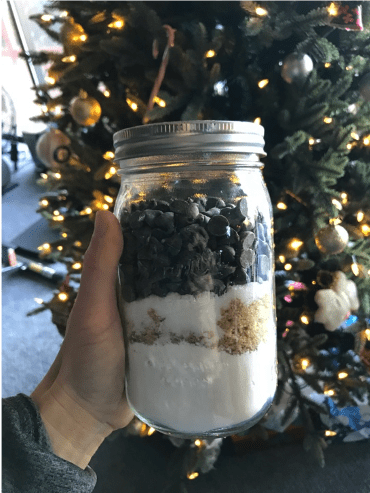
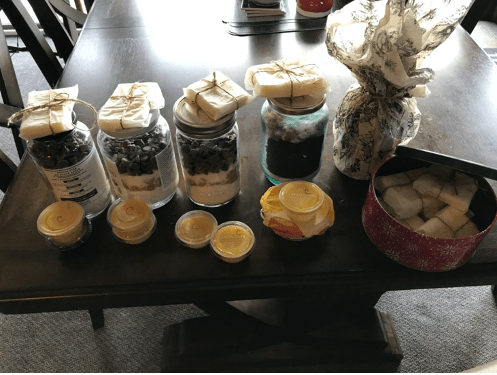
4. Cookie in a Jar
Supply List: 1 ¼ cup flour, ½ cup brown sugar, ½ cup granulated sugar, ½ tsp baking soda, dash of salt, 1 cup chocolate chips, large Ball Jar, notecard for instructions.
Directions: Using a funnel, layer the flour, brown sugar, sugar, baking soda, salt and chocolate chips in the jar. Screw the lid on and write the following directions on a note card: ”Preheat oven to 350* Pour contents into a large bowl. Melt ½ cup of butter and blend with 1 egg until fluffy. Fold into dry ingredients until mixed. Bake at 350* for 10-12 minutes. Merry Christmas!” Attach to jar with a festive ribbon and/or bow!

5. Christmas Ornament
Supply List: Plain plastic ball ornament from the Dollar store, decorative ribbon and/or rope, Epsom salts for snow, small photo or toy car
Directions: Pop ornament open and arrange the photo or contents of your choosing into the ornament. Add ribbon, Epsom salt “snow,” miniature toy tree, etc. to the ornament before closing. If desired, use paint pens to write a message like “Merry Christmas” or the year on the ornament. You may choose to hot glue a decorative ribbon or rope, or perhaps a small pine cone, around the outside as well.
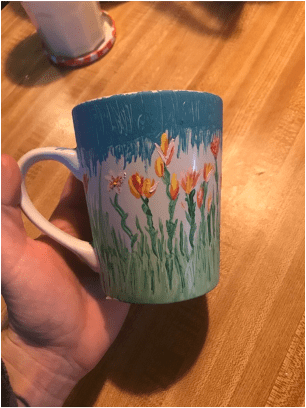
6. DIY Painted Ceramic Mug
Supply List: Plain white ceramic mug from dollar store, acrylic paint, brushes, acrylic paint pain (optional) Polyethylene spray paint (optional)
Directions: using a small brush, paint your choice design onto the mug. You may try using an acrylic paint pen to write messages, too! Allow the paint to dry for 24 hours. Place mug(s) in your oven and turn to 350* Bake for 30 minutes, then shut the oven off. This will help the paint seal to the mug. If you want, you may choose to coat your design with a poly finish. I used both the baking method and a spray top coat (Krylon brand), allowed to dry 24 hours, then washed thoroughly by hand. Avoid spraying the top portion, where you would drink from, if possible.
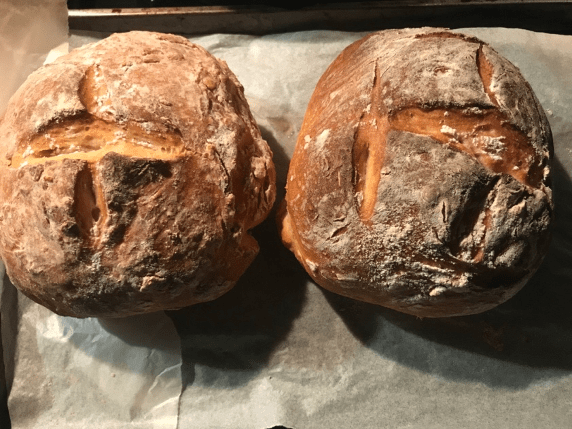
7. Homemade Yeast or Sourdough Bread
Supplies: Flour, salt, yeast, water
Directions: If you have sourdough starter, opt for a homemade loaf instead of traditional cookies and sweets for a gift. Wrapped in re-usable beeswax or decorative paper, its healthier and more unique touch! For a great guide on how to get started on sourdough baking, visit here . For homemade yeast bread, follow my favorite weekly bread recipe and bless a neighbor with some delicious bread! Reminder: wear a face mask and gloves when preparing food for someone outside of your household during Covid-19
Becca’s Favorite Homemade Bread
A simple and delicious way to reduce plastic packaging while investing in producing the foods you eat. Kids may enjoy helping knead the dough as part of a fun kitchen experiment!
*Whole wheat flour can be used in place of flour, too!
Ingredients:
- 2 cups warm water (should be warm to the touch, not boiling)
- ½ cup sugar (I use white sugar but plan to try with brown raw sugar soon!)
- 1 ½ T. active dry yeast
- ½ – 1 T. salt (I like Himalayan salt, and prefer more salt)
- 5-6 cups flour
Directions:
In a medium mixing bowl, combine water with sugar until dissolved. Add yeast and stir continuously for about 5 minutes. The mixture should look combined and froth a little. Add salt and stir for another minute. Add flour one cup at a time. (I usually add about five cups, and then beginning lightly kneading, adding pinches of flour as a go until the dough isn’t sticky to the touch). Knead for 7-8 minutes. Place in a well-greased bowl and let rise for 1 hour in a warm place. I usually Once the dough is double in size, punch down (the fun part!) and divide into two greased 9 x 5 loaf pans. Let the dough rise again for about 30 minutes. Be patient, the bread will turn out at about the height you put it in at! Bake at 350* for about 25 minutes, or until a cooking thermometer reads 190-200*. Brush with butter, let cool, and slice with a serrated knife. E N J O Y!

I’ve enjoyed giving my friends and family all kinds of combinations of these items. I like to include some homemade soap, lotion, and homemade hair conditioner in small, reused plastic tubs (saved and washed from restaurant pick up) so they can try the products first. I’ve also gotten into oil painting, and plan to give some of my best work to my close family members. Time is certainly more valuable than money, and I hope you can share the beloved resource of your time with your loved ones this year with some of these healthy, sustainable DIY gifts!
Happy Holidays!
Becca Kawaoka

Leave a comment